
Building a fireplace in a treehouse
Add warmth and comfort to your treehouse with a small wood-burning fireplace and hearth.
Won't the treehouse burn down?
Not if you build carefully and pay attention to common sense safety issues. Having a fireplace in a treehouse is like having one in any normal house. There will always be a risk of sparks flying out of an unwatched, unguarded fireplace. Keep your fire attended and use a metal mesh guard to keep sparks under control. Burn hardwoods to avoid sparks in the first place. Keep a container of water nearby at all times just in case. A fire in a treehouse could be as dangerous as one on a ship as there are very few places you can escape to.
My fireplace
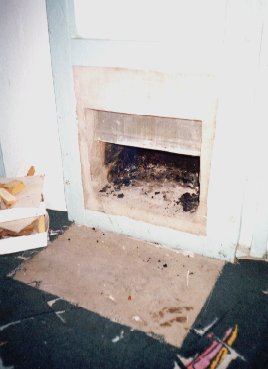
I installed a fully functional fireplace in my treehouse. It was originally just for novelty value, but was actually great when the air got a bit chilly later in the day, and it made heat out of all the off-cuts that I otherwise had to carry home. At times I wasn't able to use it because there were some squirrels living in the chimney box, then some birds. The chimney was accessible by a small opening from the outside.
Building the fireplace
There were a number of problems I experienced with getting a fireplace to work in a treehouse. Firstly, my original ideas had the fireplace itself inside the treehouse, with a chimney carrying the smoke out via a few 90 degree turns. This failed because there wasn't enough updraft in the chimney, causing the smoke to billow out into the treehouse. This is a problem with short chimneys, especially if they have corners that reduce air flow further.
It was also hard to seal the fireplace so no smoke leaked out before entering the chimney and it looked pretty messy, sitting in the middle of my (limited) floor space. I solved all these problems by moving the whole system outside the treehouse. I built a special platform bolted onto a main support (with extra bracing for the weight of bricks and concrete). On top of this I built the main surround from bricks and concrete. The concrete was carried up in bags and mixed in the treehouse. This was very dusty, and everything got covered in wet cement. I suggest you mix your concrete in a large bucket on the ground. You will probably also need a lot more concrete than it looks, so be warned!
The chimney I got was a gas boiler chimney, 1.2m (4') in length. It fixes onto surfaces with brackets that hold it about 20cm from the fixing surface. This suited me fine because the chimney is placed nicely over the middle of the burning area. When the chimney was fixed, I wrapped thin metal mesh around the base to form a funnel shape to guide the rising smoke up the chimney efficiently. The mesh was basically a guide for the concrete that was to form the actual funnel. I used wooden forms (wooden frames to contain the concrete in the areas I wanted it). I built the funnel in two layers to prevent the mesh collapsing under the weight. The finished concrete was about 7-10cm thick and formed a smokeproof seal between the bricks and the chimney.
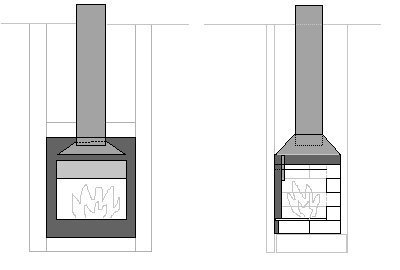
Front and side views show how the brickwork and chimney integrated with the walls.
It turned out that this basic design was not quite right, and I had to add an extra piece of metal to stop the smoke flooding into the room. This gave the effect of lowering the funnel, giving it a higher capacity to hold smoke as it was drawn up. Finally, concrete was built up round my wooden fireplace surround, to form a smoothly integrated look. A touch of paint and the whole thing looked the part.
Mixing concrete
Concrete for a fireplace doesn't need to be particularly strong, but it does need to resist heat. I made mine without any additives or special cement, and quite a lot of small cracks developed because of the heat. This isn't too serious but you're better doing it right! You will need cement, sharp sand (a blend of coarse sand and fine stones) and water. Fine aggregate/gravel adds strength but is not essential for this application. You can use a fast setting cement or premixed concrete if you prefer.
General purpose mix
- 5 parts sharp sand by volume
- 1 part cement by volume
Prepare the forms you'll be using, then mix these dry ingredients together well. Keeping the mix on the dry side, add a little water at a time until the mix holds together. Concrete hardening is a chemical process so only a certain amount of water is essential. Excess water has to evaporate out of the set concrete, leaving tiny voids in the material which reduce strength. Again, this is more important in a more structural situation.
The mix will harden in a few hours in a warm environment (or under half an hour if you used fast setting cement). You can remove the forms but it'll be pretty crumbly for a while longer so leave the forms in place if you can. Now is a good time to score the surface with patterns, the year, etc. It takes around 24 hours to properly set but cold temperatures will extend this period. As mentioned above, firebricks and fireproof cement will stop gaps and cracks appearing. In theory, ordinary bricks may explode if heated while wet, so firebricks are a good bet. If you want to risk it, ensure all concrete and bricks have had at least 2 weeks of dry conditions before lighting your first fire and keep the fire small for the first few hours of use. The masonry of the fireplace needs to be protected from rain by covering or rendering the outside surface.
Improvements on my design
Concrete and bricks are very heavy and should only be used where there is ample support for them. I would estimate my fireplace at about 80kg (180lb), so bear this in mind when planning supports. It is essential that the supports don't move after they are fitted, as the bricks will be twisted and may develop cracks. I recommend fixing supports onto existing treehouse supports so the fireplace can move with the wind in the same way as the wall.
Firebricks would be better for lining a fireplace, to avoid the risk of damp bricks exploding. The chimney should always be kept out of contact with wooden parts and ideally would be made to a double layered insulated design to keep the outer surface cool.
Steel woodburning stoves are a good idea for larger treehouses. The risk of sparks escaping from the fire is much less, and the stove can be kept away from the wall to avoid overheating wooden parts.